The 4 X 100 Relay Handoffs

There are many ways to work that baton around the track, but some work better than  others .. and some don’t work at all when you are working with grade school  children. This procedure is a good one since it is easy for the kids to  understand the basic concepts, and it works in practice as well as theory.  When I was coaching, we would start working on handoffs the very first practice and didn’t stop until the season was over … For some reason, kids love relays and don’t mind practicing them since it’s less competitive and seemingly easier than individual time trials or conditioning drills. All work and no play at practice can deplete the roster pretty quickly..

The basic concepts are:

    (1) the baton always moves Right Hand, Left Hand, Right Hand, Left Hand

    (2) the baton is always moving down the center of the lane

    (3) the baton stays in the same hand it was received in; no switching

    (4) runners on the curve run the inside of the curve; the backstretch and anchor runners stay to the outside of their lanes. 

The sketch below shows the three handoff points.


Relay Fundamentals - The Zone

The sketch below shows the basic configuration of the handoff area which is comprised of an acceleration zone and a handoff zone. In general, except possibly for your #1 Senior Boys relay team, you can ignore the acceleration zone in grade school track. Rules mandate that the handoff must take place in the 20 meter handoff zone, but the League will not disqualify a team for non-compliance .. I’ve seen instances where the waiting #2 runner took off so soon, that they were half way down the backstretch before the incoming runner finally caught up .. no advantage gained usually. All runners should know the rules, however.


Relay Fundamentals - Getting Ready

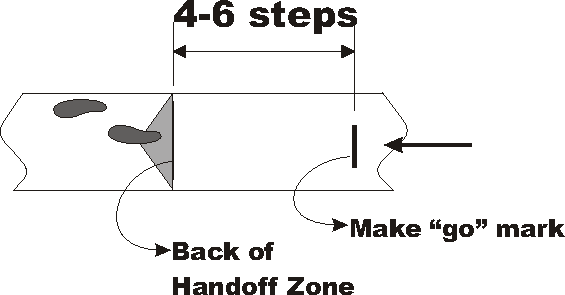
All runners except the Leadoff should make a “Go” mark; I used to have Juniors walk back 4 steps and Seniors 5-6 steps from the back of the Passing Zone to make a visible mark in their lane. At Mater Dei it was easy since it was a cinder track; modern tracks may require a little innovation. This is the “Go” mark. The waiting runners then line up at the back of the handoff zone at the inside or outside of the lane as appropriate (explained later). 


Relay Fundamentals - The Handoff Rules

The waiting runner watches the incoming runner approach; when the incoming runner reaches the “Go” mark, the waiting runner turns and begins to run at about 75-80% speed looking straight down the track .. Very Important - NO PEEKING .. If the receiver is looking at the handoff, they are grabbing at the baton while the incoming runner is poking .. and they never grab and poke at the same spot. The receiving runner holds their hand straight behind them at hip level with the palm facing up and the thumb facing in .. Give the incomer a nice steady “target” and don’t peek .. The receiver just waits until they feel the baton in their hand and then accelerates to top speed

The incoming runner must stay to the inside or outside as appropriate - if the receiving runner and incoming runner are positioned correctly, they are on opposite sides of the lane so there is room for running side-by-side while the handoff occurs if necessary. The incoming runner must not slow down for the handoff and must not say anything .. No “Go” or “Move It” .. ; that’s what the mark is for. Some teams want the incoming runner to say “go” as the signal for the waiting runner to begin running .. That’s looking for trouble .. In the heat of a race, lots of times the incoming runner just forgets to say anything, or they say “go” when they are still 25 yards away from the waiting runner .. remember that middle of the backstretch handoff I talked about earlier?

Some last points .. The incoming runner should continue running “normal” until just before the pass .. You sometimes see the incomer extending their arm and the baton before they get anywhere near the handoff .. Keep those arms pumping until just before the handoff and as noted above, don’t slow down because the receiver is slow to go - that’s their fault; don’t compound the problem. No “Tomahawk Chop” passes either .. They hurt, and if the “chop” misses the target, oooops!! Just lay the baton in that waiting palm nice and easy. After the pass, the incoming runner must stay in their lane; come to a complete stop; turn around to see what’s happening and wait for the track to clear before leaving the track .. Interference is cause for disqualification.

If all works well, the pass should be made by a full speed incoming runner making the pass to an accelerating receiver who can be at top speed in just two steps after making the pass .. Later in the season, you can work with the #1 relay teams to tweek the position of the go mark so the pass is made with both runners essentially at full speed .. A good handoff is a thing of beauty and worth working for!


Relay Fundamentals - Handoff Details

1st Handoff

The Leadoff Runner has the baton in the right hand and runs the inside of the lane around the curve. The receiver is positioned as shown in the sketch and watching the incoming runner come around the bend .. The left arm is extended and when the incoming runner hits the “Go” mark, the receiver turns and runs down the outside of the backstretch. The baton stays in the left hand which brings it down the middle of the lane which is where is should be for the next pass at the 200m mark.


2nd Handoff

The Number 2 Runner has the baton in the left hand and runs the outside of the lane down the backstretch. The receiver is positioned as shown in the sketch and watching the incoming runner approach .. The right arm is extended and when the incoming runner hits the “Go” mark, the receiver turns and runs the curve on the inside of the lane .. The baton stays in the right hand which brings it down the middle of the lane which is where is should be for the next pass at the 300m mark.


3rd Handoff

The Number 3 Runner has the baton in the right hand and runs the inside of the lane around the far curve. The Number 4 (Anchor) is positioned as shown in the sketch and watching the incoming runner come around the bend .. The left arm is extended and when the incoming runner hits the “Go” mark, the receiver turns and straight to the finish .. The baton stays in the left hand since moving it is a distraction. As the Anchor Runner runs through the tape, they throw their arms up in jubilation!! Just make sure, win or lose, they don’t throw the baton .. That’s another cause for disqualification.


How to Teach the Handoff

Start with a demonstration; gather up a group and explain the track setup and the relay zone configuration. Go over the basics (RH-LH-RH-LH, etc.as discussed on the 1st page). Follow up with an on-the-track handoff demo using two people who are familiar with the process (one of them can be you). Show the group where to stand in the lane - stand to right side; left arm is extended and vice-versa; and how to make a “Go” mark. Show what happens if the receiver leaves too soon or too late - stress the No-Peek concept with the futility of poking and grabbing. 

After the demo, line up the group in teams; you can have more than four to a team for practice. I used to use 75-100’ intervals and stretch teams downthe track. Have each team member figure out which hand to use by counting off “Right Hand; Left Hand, … “ starting with the 1st runner. As noted during the demo, if receiving with the left hand, stand to the right, etc.

When everything is set, let them run - first one way and then the other; back and forth. Start by running only one team at a time; perhaps the best way to learn is to watch the mistakes of others. After a couple of intervals of running only one team at a time, let them all run at once in a simulated race. Before you know it, 30’ are gone, the kids have gotten in a good interval session, and had fun doing it .. plus they now should be starting to understand how to move that baton around the track. 

After a couple of weeks when your team more or less gets an understanding of the handoff process, I used to set up “infinite” relays - teams of nine runners with each runner going 50m. Line the teams up around the track (start, middle of curve, 100m, middle of backstretch, etc. with two runners at the starting point. When you line the relays up before sending them out to their track positions, make sure they know who on their team is in front of and behind them or you’ll have mass confusion!! Put the fastest teams to the outside and don’t use staggers .. The extra distance will tend to even things up

When everything is set (it really helps to have some adult help scattered around the track), let them run .. After each handoff, the runner returns to the start line for that station and waits for the baton to come back around the track .. And just keep them running. The Infinite Relay is an excellent drill that is well worth the effort to get organized at the start. I used to use Infinite Relays as a final drill in many practices and I don’t think the kids ever got tired of it …

A final comment: The above Handoff procedure, using the NoPeek rules, is not recommended for use in other relays where the incoming runner has run 200m or longer. For those types of relays, it is recommended that the receiver face the infield with the left hand extended .. This allows them to watch the incoming runner approach, as well as be aware of runners leaving before them in the inside lanes so they can move in if necessary to meet the incoming runner. Since the incoming runner is going to be tired, it is best for the receiver to still use a “Go” mark, but don’t start running any faster than 50% speed and keep watching until the pass is made.


Good Luck