|
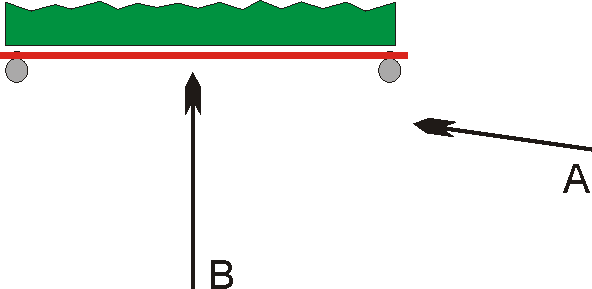
Everyone should have the opportunity at least once in their lives to try the Fosbury Flop (I remember when there was no such thing .. (at my age, I'm surprised I remember anything … !); a few of you may truly amaze yourself (some of us are just abject failures, however .. isn't there a saying "if you can't do, teach" .. ?). Some of my most satisfactory experiences with coaching track came during the first Junior Girl high jump practice of the year. Year after year, some "non-athlete" re. all conventional experiences to-date by these little girls would be an absolute star in the high jump. Usually long, lanky, and slow, they became the picture of grace as they somehow had the natural talent to plant their foot, twist their body, and get up and over the bar .. To watch someone discover an unknown ability is truly a rewarding experience. So, then, the question is how do you teach the little ones how to jump? The following is an attempt to put into words a process that evolved over time, and proved to be quite successful … keep in mind that there are quite a few kids, some otherwise good athletes, who just cannot master the technique - they will go through life doing 2-footed jumps, going over the bar sideways, or flying through the air like they are sitting upright in a straight-backed chair. Some, however, like those little Junior Girls, just take to the event like a duck takes to water .. sometimes they may have an awkward beginning, but eventually something "clicks" and then it just becomes a question of "how high can I go?" .. High Jump Basics - Some "Don'ts"The following sketch shows a plan view of a high jump setup .. two standards and the bar. The object of the event is to somehow approach the bar, jump, and get the body over the bar starting with the arms and head followed by the hips, and eventually by the feet, leaving the bar still resting on the supports .. |

| Perhaps the best way to learn how to jump is to
understand some basic "don'ts" … For whatever reason, kids
seem to like to approach the bar with a path that takes them essentially
parallel to the bar .. in the extreme, represented by Path A above. They
get themselves way off to the side of the bar; run as fast as they can,
and launch themselves in an arc that is doomed before it begins. The
entire jump; up - over - and down takes place in the same place that the
bar is .. the jumper is either going to hit it on the way up, or come
down right on top of it. Another disadvantage of this type of approach
is that the jumper probably wipes out the far standard and possibly
misses the mat on the way down .. ouch!! It should be obvious that the
"flat" approach is not very efficient, but yet a lot of
jumpers will persist in this type of approach.
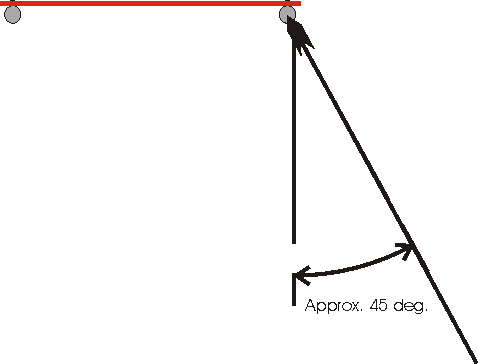
So, if the flat, parallel approach never gets the body over the bar, than the obvious solution is approach the bar so the body spends as little time as possible over the bar perhaps? That approach is shown as Path B in the above sketch. Although the concept seems to makes sense, in practice it is just as bad as Path A. In order to get over the bar, the body must turn so the back is facing the bar. With the Path B straight-on approach, it is impossible to turn the body efficiently to achieve the correct body position and jump vertically at the same time .. the Path B approach may be the only way to go if the event is the Long Jump, but it doesn't work at all for the High Jump. A compromise is the solution: The correct was to approach the bar, it turns out, is at a angle of approximately 45 degrees as shown in the following sketch. I apologize to any and all who jump off their right foot (i.e., approach the bar from the left) .. just mirror image essentially everything that follows. |

High Jump Basics - The ApproachThe jump should occur such that the hips go over the middle of the bar which, because of sagging, is the lowest point of the bar. With a correct approach and plant position, the jumper will also end up on the mats, which should be the #2 goal of all jumpers (I don't have to mention what goal #1 is, do I?). I've seen a lot of jumpers, with a too-flat approach and/or a plant too far past the near stanchion, end up not on the mat but on the asphalt .. lots of reasons not to do that! The jumper should run essentially at the right standard at the proper angle until approximately the last four to six steps (depends on stride length), at which time they start to curve their approach to the bar as shown in the following sketch. The curved approach will allow the jumper to maintain approach speed, gather or "crouch" the body for the jump during the next-to-last step, and plant-pivot-jump on the last step with the outside or left foot. The curved approach helps the body to rotate/pivot so the jumper's shoulders become square to the bar. The curved approach will also provide forward momentum which will carry the body over the bar and onto the mat - the jumper doesn't have to worry about jumping over the bar since the body is going to go that way no matter what. With the correct foot plant and pivot, all the jumper has to worry about is jumping vertical. You will see "new" jumpers not get a full pivot since they instinctively "reach" their right arm over the bar and, as a result, they invariably go over the bar sideways and wipe it out with their side. The plant & pivot should have the jumpers body square to the bar and facing away from it so the back can be arched which will bring the hips up and over the bar. If the body isn't square to the bar, it will be impossible to effectively arch the back - with no arch, high jumping is often called low jumping!
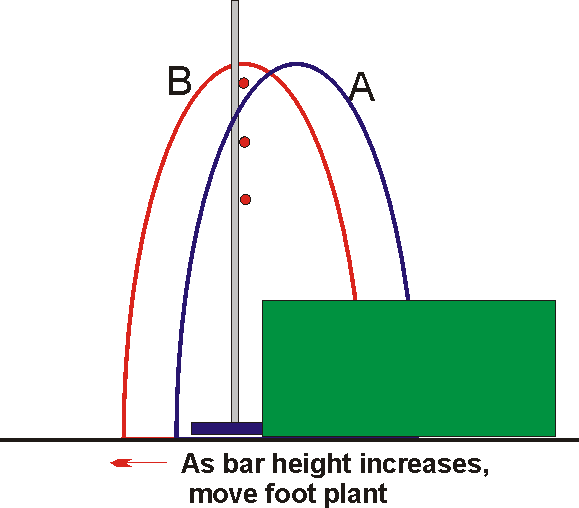
Jumping Details - One Step at a TimeTaking things one step at a time; the approach is angled with the initial direction aimed for the near standard. The jumper's approach speed should be something less than maximum to maintain control while jumping; too much speed and it will be difficult to make the transition from running horizontally to jumping vertically! A note of caution here: there is no such thing as the "correct" speed - some jumpers do best with a very fast (e.g., 80% speed) approach, while others use a very bouncy, slow (e.g., 60% speed) approach - the "correct" approach speed is a highly individualized concept. As the jumper approaches the standard, the approach is curved with the goal being a plant slightly to the right of the center of the bar such that the body goes over the middle of the bar during the jump. The third to last step, the jumper prepares to gather the body in preparation for the vertical jump; the second to last step is the gather during which time the body crouches in anticipation of the jump - again, too much speed and an efficient gather is impossible. During the gather, the knees bend, the body crouches, the arms go back in anticipation of the jump. The last step is where a lot of things more of less happen at the same time. The curved approach becomes almost tangent with the bar and the left foot plants. As the plant is made, the body pivots to become square with the bar, and the jump is executed with both arms and the right knee driving upwards while the left leg acts like a spring sending the body up and over the bar … remember; because of the curved approach, momentum will automatically carry the body towards the mat .. there is no need to "jump" in that direction .. every motion should be focused on just going vertical .. with the correct curved approach, the horizontal motion is going to happen automatically! As the body travels vertically, both arms are thrust over the head and the head is looking backward and upward over the right shoulder. The head position enables the back to arch as the shoulders travel over the bar; once the hips clear the bar, the jumper needs to make sure they "kick" to get their heels up so the trailing feet clear the bar as well .. One last detail regarding the plant position. I already discussed the plant position relative to the middle of the bar, but the distance from the bar is important as well. If the plant is too close to the bar, the body will hit the bar on the way up. Conversely, if the plant is too far from the bar, then the apex of the jump will occur in front of the bar, and the bar will be hit on the way down. Obviously, the distance of the plant from the bar is pretty important. One thing to watch out for with "good" jumpers is the need to move the plant (and subsequently the approach starting position) further from the bar as the height increases. As can be seen from the diagram below, the "Jump A" plant position that is OK at a low height is not acceptable as the bar height increases. If the jumper is hitting the bar on the way up, tell them to "move back" (e.g., Jump B) .. it should be easy to visualize that if the takeoff point for Jump B is too far from the bar, then the peak of the jump will take place in front of the bar, and the bar will be hit on descent. |

How to Teach the High JumpKnowing how to jump and teaching it are two different things; this section discusses how to introduce new jumpers to the event? What I did was, early in the season, line everyone up in a row facing me while I went over the fundamentals of the proper approach, the foot plant along with "turning your back on the bar" (i.e., the pivot), and the need to jump vertically - don't worry about landing on the mat. What takes quite a few words to describe, is actually fairly easy to demonstrate. Then I would get them all to "hop", using a 1-2-3, left-right-left, sequence … (1) step, (2) gather/crouch, (3) pivot/jump -- get those arms working! Of course, they are all looking at you like you're just a little crazy, and there is a lot of giggling and self-consciousness, but if you persist and urge and cajole, you can usually get just about everybody hopping around the field for a bit .. 1-2-3 .. left-right-plant/pivot/jump .. "drive that knee up; use those arms; jump!" .. After a little while, a rhythm is established which will help to minimize the number of "two-foot" jumpers you will undoubtedly have and acquaint the students with a "feel" for the process. The next step is to line them up positioned close to the mat with no bar. Now have them do the left-right-left "thing" and jump on the mat .. the focus now is on the jump. You want them to plant/pivot and jump "straight up" .. as vertical as possible with the shoulders turned square to the mat .. the goal is to jump such that the first thing that hits the mat are the jumper's shoulders and not their rear end, plus the act of plopping on a mat is generally considered fun by all .. the initial reluctance to practice the left-right-left hopping exercise, is usually forgotten; they all (Junior Boys in particular!) want to plop on the mat ... After about three attempts with the short approach and no bar, move the group back to a normal jumping position and let them essentially repeat the exercise with a running approach. A couple of running jumps (keep reinforcing the rhythm of the last three steps) and they will be ready for the bar. At first, keep the bar low, obviously; just a bit higher than the mat itself, and see what happens. For the initial learning sessions, I would recommend using those tape-type bar substitutes with the little weights at the end - if the jumper lands on the mat with the bar under their shoulder blades, it can really hurt and you may "scare" some prospective good jumpers. Also, beginning jumpers (especially Senior Boys) tend to break bars, and a new bar can be hard to come by (freight costs are huge!). Teaching the high jump is always an adventure, but one that I always enjoyed. With a little patience, you should end up with a pretty good percentage that will be capable of jumping over the bar, and a few, with some surprises I'd be willing to bet, that really have a knack for the high jump .. Good luck with your teaching, and good luck to your jumpers .. ! |
